
How to force deployment of Chrome Apps and Extensions to Windows PCs by Group Policy

In a Google Apps domain you can easily deploy apps and extensions to users via the management console. These apps deploy when a user signs into a Chromebook or actively signs into Chrome on a PC. If you want to make the Apps appear automatically on a PC you can either employ a single sign-in solution or push the apps out via Group Policy to the end users.

To push them out via Group Policy you will need the following:

  • PCs in a domain environment - so connected to a domain controller.
  • The Chrome ADM added to group policy on your domain controller. See my blog post on this. 
  • The ID of the app  

ID of the App

Install the extension you want in Chrome and then go to 'Tools' 'Extensions' in Chrome:


You need to enable 'Developer mode' for this to work. The ID you need is the long string of characters.
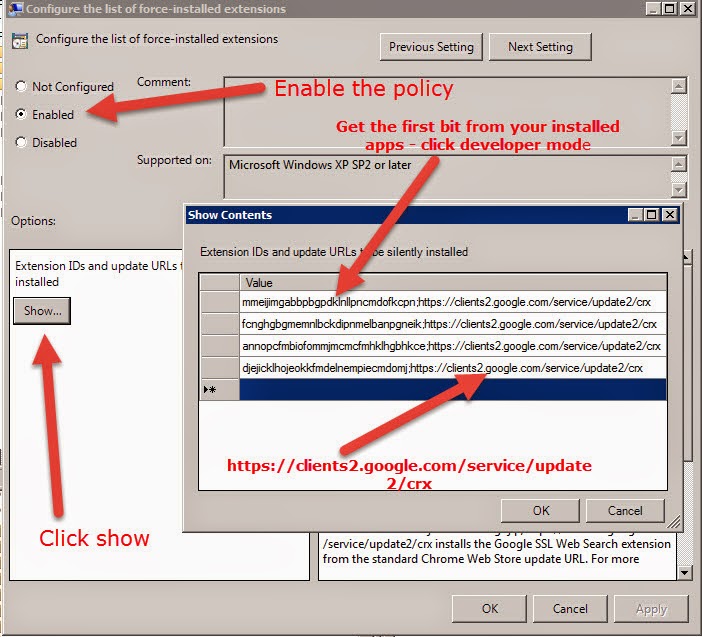
Enable the Policy

Navigate to your Chrome Policy in Group Policy Management:


Open up this policy:


As shown above - enable the policy. Click 'Show' and add each app on a new line. Each entry starts with the ID or the app, then a semi-colon, then the update url - normally https://clients2.google.com/service/update2/crx

Test on a user with the policy applied

After opening up Chrome, you should see the apps and extensions appear as below:


Comments

Popular posts from this blog

Delete a specific email using GAM

If a user send an inappropriate email to a loads of people or get stung by some sort of email exploit you can quickly delete the email from all of the recipients using a GAM command. Step 1 - get the email header Go into Google Vault and search for the offending user or someone known to have got the message. Click show details and grab the email ID. This will be a long string of characters followed by @mail.gmail.com Step 2 - find out who has the email Go into Google Vault and find the original message sent by the offending user. Look at the details to see who got it. Copy the list and dump it into a spreadsheet. Clean up to just a list of emails with a column header 'mail'. Save as a csv file. Step 3 - delete messages with GAM Put your CSV file in your GAM folder - this e.g. assumes its called mail.csv Run: gam csv mail.csv gam user ~mail delete messages query rfc822msgid: MESSAGEIDHERE doit The alternative nuke option is: gam all users delete messages query rf

Adding subdomains to G Suite

This is how I add subdomains (so basically new schools) to out G suite setup. I've got these steps documented on a scruffy set of notes that I've now got in Keep - so time to document them - for myself as much as anyone else! Steps in order (roughly) Add the new domain Verify the new domain Add MX records to hosting Add SPF record for Google to hosting Turn on email authentication Add DMARC record to hosting Setup custom Directory and restrict students OU to this. Create an admin quarantine for the domain. Configure SPAM setting for the domain. Turn on and off services as appropriate. Map a blank Google Site to the naked domain - if required. Setup some basic groups - allstaff, allusers (for directory) and students with appropriate permissions. Deploy custom wallpapers. So the steps in a bit of detail: Add the new domain & Verify ownership Click on Domains in the admin console: Add/remove domains followed by "add a domain" At this

My favorite GAM commands - well a few of them at least!

Where would be without GAM? Paying for expensive syncing tools or doing tedious manual tasks in the admin console. GAM can automate most things you might want to do in G Suite. So these are a few of my favourite commands - one I use either as part of a batch file - or just standalone. There are loads more - but these are ones that are used daily. Classroom Create a spreadsheet of all your domains classes -  gam print courses todrive Create a spreadsheet of a teacher's classes:  gam print courses teacher fred@mydomain.com todrive Bulk create classes: gam csv classes.csv gam create course alias ~alias name ~alias section ~subject teacher ~teacher status ACTIVE where classes.csv is a list of classes you want to make. Add teachers: gam csv teachers.csv gam course ~alias add teacher ~teacher Add students: gam csv students.csv gam course ~alias add teacher ~student Sync Students (in this example to a group - but could be an ou/csv file) gam csv groups.csv gam course ~g